Final Project: Close Up picture
I decided to draw another close up picture for my final project. But this time I didn't draw it with only pencil, I decided to draw it with color pencil. I have never done it before and I'm really glad that I tried it out because I really enjoyed to draw the close up with color pencils. I pivked out to draw a leaf with a water drop. After I was done with my leaf and my water drop, I started my background in blue.
I decided to draw another close up picture for my final project. But this time I didn't draw it with only pencil, I decided to draw it with color pencil. I have never done it before and I'm really glad that I tried it out because I really enjoyed to draw the close up with color pencils. I pivked out to draw a leaf with a water drop. After I was done with my leaf and my water drop, I started my background in blue.
Project 8: 3-Point-Perspective
After we practiced different perspectives of different point of views, I decided to draw my city out of the three-point bird perspective. Before I started to draw I put my paper in angle and after I was done with the basic lines of my city I painted my drawing with ink and ink pen. I kind of like how it turned out but I didn't enjoy the ink my drawings. It was not as easy as I thought. And also, I messed up one time, so that I have got a big ink trop in the middle of my drawing nw.
After we practiced different perspectives of different point of views, I decided to draw my city out of the three-point bird perspective. Before I started to draw I put my paper in angle and after I was done with the basic lines of my city I painted my drawing with ink and ink pen. I kind of like how it turned out but I didn't enjoy the ink my drawings. It was not as easy as I thought. And also, I messed up one time, so that I have got a big ink trop in the middle of my drawing nw.
Project 7: Collagraph Printing:
For my final plate I decided to make two different plates. On the one I'm drawing a mandala that I created on my own. Out of the other plate I cut out a wolf. My plan is to print the mandala first and the wolf on it, so that the mandala looks like a moon. First I printed my plate and my wolf separate to see how they are turning out and to look how much ink I have to put on before I print it. When I got around 5 of each done I started printing the wolf on my printings from my mandala.
For my final plate I decided to make two different plates. On the one I'm drawing a mandala that I created on my own. Out of the other plate I cut out a wolf. My plan is to print the mandala first and the wolf on it, so that the mandala looks like a moon. First I printed my plate and my wolf separate to see how they are turning out and to look how much ink I have to put on before I print it. When I got around 5 of each done I started printing the wolf on my printings from my mandala.
Project 7: Collagraph Printing Practice:
Before we started our real project we practiced. We tried to print different kind of matter on our three practice plates. After we printed all plates with the intaglio and relief technique we had to decide which technique we are using for our final plate. I decided to use the technique where you cut in your plate.
Before we started our real project we practiced. We tried to print different kind of matter on our three practice plates. After we printed all plates with the intaglio and relief technique we had to decide which technique we are using for our final plate. I decided to use the technique where you cut in your plate.
Project 6: Self portrait
Our next project is to draw a self portrait. First we went over the general face structur to get an idea how to draw a real face. Then we started to draw our head, then the eyes, then the nose and then the mouth. I decided to draw one half of my face as a skull. So then i finally started with the shading. The hardest part of shading and drawing was the hair. My symbols are a melting face because I like Halloween, a skull because I love biology and in the background there's a German and an American flag, because I'm from Germany and I live in America.
Our next project is to draw a self portrait. First we went over the general face structur to get an idea how to draw a real face. Then we started to draw our head, then the eyes, then the nose and then the mouth. I decided to draw one half of my face as a skull. So then i finally started with the shading. The hardest part of shading and drawing was the hair. My symbols are a melting face because I like Halloween, a skull because I love biology and in the background there's a German and an American flag, because I'm from Germany and I live in America.
Final Project: Close up picture
For my final project, I chose a close up picture of a fox. I started my drawing with the head lines of the fox' face and then I started to draw the basic direction of the hair. After I was done with my basic hair direction I started to look on the shading of the hair, the eyes and the nose. After all I mapped my Final Drawing.
For my final project, I chose a close up picture of a fox. I started my drawing with the head lines of the fox' face and then I started to draw the basic direction of the hair. After I was done with my basic hair direction I started to look on the shading of the hair, the eyes and the nose. After all I mapped my Final Drawing.
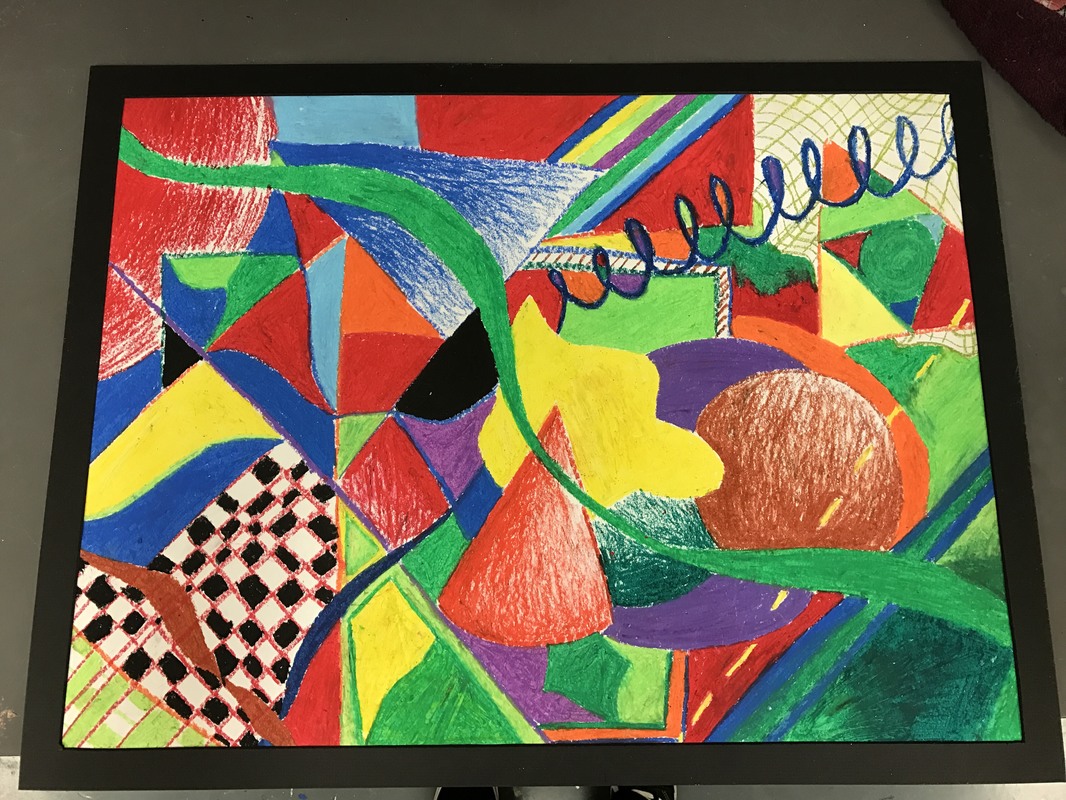
Project 5: Abstract
This main point of this project was literally to color the paper with colors and forms, how you personally want to do it. I planed to draw my paper with two main colors, green and red. It supposed to be two fronts which kind of fight against each other. On the left side at the top is the red side and on the right side at the bottom the green side. In the middle it suppose to look like the colors would mix together and creating new colors.
This main point of this project was literally to color the paper with colors and forms, how you personally want to do it. I planed to draw my paper with two main colors, green and red. It supposed to be two fronts which kind of fight against each other. On the left side at the top is the red side and on the right side at the bottom the green side. In the middle it suppose to look like the colors would mix together and creating new colors.
Project 4: Alebrijes
In this project we made a Alebrijes. Our first step was to made our own clay. We had to mix the clay for a time that all the ingredients were mixed together. Then we formed two bowls with our clay and cut some marks on the top of the bowls, put a little water on it and then put them together. That was supposed to be our body that we formed afterwards. Then we began to form our legs, wings, tails or whatever for our Alebrijes. I made a head and body from a tiger, a tail from a snake, the legs in the front from a bird and the legs in the back were supposed to be legs of a dog. I was thinking about it, that the tiger head is fighting with the snake tail, but that did not work very well, because the snake broke every time.
In this project we made a Alebrijes. Our first step was to made our own clay. We had to mix the clay for a time that all the ingredients were mixed together. Then we formed two bowls with our clay and cut some marks on the top of the bowls, put a little water on it and then put them together. That was supposed to be our body that we formed afterwards. Then we began to form our legs, wings, tails or whatever for our Alebrijes. I made a head and body from a tiger, a tail from a snake, the legs in the front from a bird and the legs in the back were supposed to be legs of a dog. I was thinking about it, that the tiger head is fighting with the snake tail, but that did not work very well, because the snake broke every time.
Project 3: Close up photo
Our next project is all about Close Up pictures. We started searching for an close up photo and started drawing it. After I was done with my basic drawing lines, I began to draw the "feathers" of the eagle, that I picked out, and started to shade his beak. After I had my basic done, I drew and shaded more details into the feathers and his beak. After I was done with my whole drawing I cut a black paper into the right size and taped my drawing on the back into the hole of the paper.
Our next project is all about Close Up pictures. We started searching for an close up photo and started drawing it. After I was done with my basic drawing lines, I began to draw the "feathers" of the eagle, that I picked out, and started to shade his beak. After I had my basic done, I drew and shaded more details into the feathers and his beak. After I was done with my whole drawing I cut a black paper into the right size and taped my drawing on the back into the hole of the paper.
Project 2: Shading
First, we had to try our best to draw and to shade different figures. After that, we spoke about the different shadings and practiced to shade again. After our practice, we drew and shaded the same figures again to look how good we improved in our shading technique.
First, we had to try our best to draw and to shade different figures. After that, we spoke about the different shadings and practiced to shade again. After our practice, we drew and shaded the same figures again to look how good we improved in our shading technique.
Project 1: Sketchbook
Our first project in our art class is our sketchbook. First we created our front and backpage with watercolor and crayons. We could write or draw whatever we wanted on the waterproof paper. After we sprayed the paper with water, we painted our paper with color drops in different colors. After that, you could see the white spaces that we have colored with the crayon. You could garnish your swatch with salt, so that there a little points in the color. I wrote my name "Gina" on the paper and painted it with blue and green color. After it dried, I sticked it in my sketchbook as the front and backpage. I created my sketchbook with stabile paper and a middle piece with holes and covered it with green fabric. After I finished my sketchbook I stitched 4 signature with 5 papers through the hole in the middle and the fabric. After all I panited a half dreamcatcher on the front of my sketchbook.
Our first project in our art class is our sketchbook. First we created our front and backpage with watercolor and crayons. We could write or draw whatever we wanted on the waterproof paper. After we sprayed the paper with water, we painted our paper with color drops in different colors. After that, you could see the white spaces that we have colored with the crayon. You could garnish your swatch with salt, so that there a little points in the color. I wrote my name "Gina" on the paper and painted it with blue and green color. After it dried, I sticked it in my sketchbook as the front and backpage. I created my sketchbook with stabile paper and a middle piece with holes and covered it with green fabric. After I finished my sketchbook I stitched 4 signature with 5 papers through the hole in the middle and the fabric. After all I panited a half dreamcatcher on the front of my sketchbook.
